|
|||||||||
Disneyland Main Street, U.S.A. Platform Lighting Kit Installation Instructions
Disneyland Main Street Platform Lighting Kit Instructions Before installing your lighting kit, please read these instructions thoroughly to familiarize yourself with the installation process.
Contents in the Lighting Kit: Lighting System “A” 3 Transformers Lighting System “B” 68 ohm Adapter Lighting System “C” 100 ohm Adapter
Step #1: Remove all the contents from your Lighting Kit and make sure you have all the parts. You may have to open your Lighting System “A” and Lighting System “B” to find your 68 ohm and 100 ohm adapters. At this point, you should remove the adapters from the Lighting Systems. The adapters will only be needed if you have the older, battery operated only Sleeping Beauty Castle and/or Central Plaza.
Step #2: Prepare your platform for the Lighting Kit installation by propping up the platform using either green oasis blocks (8 inches x 4 inches x 2 ½ inches - you can get these from your local craft store) or blocks of wood of similar dimensions. You will need 6 blocks (one for each corner as well as 2 that will go along the middle edge. This will raise your platform by 4 inches and allow you work on the installation of the lighting under your platform as well as on top. You should also remove the Main Street Road and set it aside in a safe place. Once you have completely installed your lighting you will remove the blocks and lower your platform back to its’ normal position as well as return the Main Street Road to its’ proper place.
Step #3: When installing Systems “A” & “B”, you should layout the entire systems from the top at the Castle end down to Train Station. Connect the unit that is closest to the Castle (or the Castle for system “A”) first and work your way down the right or left side of the street. You will only need to connect the green/red wire plug to the lighting system, except for the Castle and Central Plaza. For the Castle and Central Plaza you will need to connect both wire plugs for the newer versions of these pieces, or you will need to use the adapters to connect the older, battery only versions. Use the 68 ohm adapter for the Central Plaza and the 100 ohm adapter for the Sleeping Beauty Castle. Plug the adapters into one of the lighting system plugs and then attach the nine volt adapter to the nine volt adapter on the unit; plug the fake “AA” battery into the unit where the battery would normally go. Finally, feed the extra length of the lighting systems down the hole beneath the Main Street Road near the Train Station and pull it down and out to the side of the platform that you will want to have the light switch on. Plug the lighting system into one of the transformers and connect to an electrical outlet. Initially you may have to push up and down on your fire hydrants to make sure the channel is in the open position to allow the electrical power to reach the lighting in the buildings. Once this is done the first time, you will be able to control the turning on and off of that side of the street with the one external switch.
Step #4: When installing System “C”, you will need to plug each unit in from beneath the platform. Special care is needed in working with the Disneyland Marquee. See detailed instructions later. Once all your pieces are plugged into the lighting system, you can pull the extra length of the lighting system out toward the side that you wish to have the light switch on. Again plug the lighting system into a transformer and plug this into an electrical outlet.
Step #5: Once everything is operating and lighting correctly, you are done and can now remove the blocks and lower your platform back into its normal position. Replace the Main Street Road and return all the buildings to their normal positions against the road. Congratulations! |
LIGHTING KIT SYSTEM “A” Special Note: Each piece will only require you plug into the green/red wire plug on the units, except where indicated.
A1 Sleeping Beauty Castle – transformer version
A2 Sleeping BeautyCastle – transformer version
Note: If you have the new transformer version of the SleepingBeautyCastle, you need to use both plugs to make your piece light up
A2 Sleeping BeautyCastle – battery only version
Note: If you have the older battery only version of the SleepingBeautyCastle, you need to use only plug A2 and you will use the 100 ohm adapter to attach your SleepingBeautyCastle to the lighting system
A3 CarnationPlazaGardens
A4 Gateway to Adventureland ~ Frontierland
A5 Plaza Pavilion ~ Aladdin’s Oasis ~ Enchanted Tiki Room
A6 CandyPalace ~ Refreshment Corner
A7 Carnation Café ~ Bakery ~ Ice Cream Parlor ~ Penny Arcade
A8 Crystal Arcade and New Century Jewelry
A9 Emporium
A10 City Hall and Fire Station For a larger image of the image click here. |
 |
 |
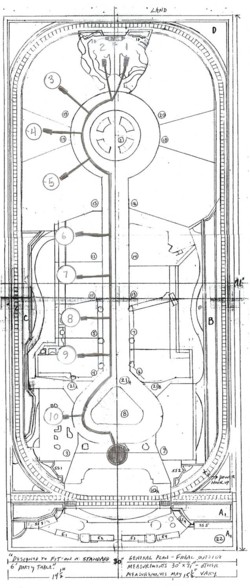
LIGHTING KIT SYSTEM “B” Special Note: Each piece will only require you plug into the green/red wire plug on the units, except where indicated. B1 King Triton’s Garden ~ Snow White’s Grotto
B2 CentralPlaza – transformer version
B3 CentralPlaza – transformer version
Note: If you have the new transformer version of the CentralPlaza, you need to use both plugs to make you piece light up
B3 CentralPlaza – battery only version
Note: If you have the older battery only version of the CentralPlaza, you need to use only plug B3 and you will use the 68 ohm adapter to attach your CentralPlaza to the lighting system
B4 Astro Orbitor
B5 Plaza Inn
B6 Crystal Arts ~ China Closet ~ Main Street Photo ~ and East Plaza Street
B7 Castle Bros. ~ Disney Clothiers ~ and East Center Street
B8 Market House ~ Disneyana ~ Main Street Cinema
B9 Disney Showcase ~ Magic Shop ~ 20th Century Music Company
B10 Hat Shop ~ Opera House ~ Bank of Main Street
B11 Town Square Click here for larger image. |
 |
LIGHTING KIT SYSTEM “C”
Special Note: C1 & C4 (Disneyland Marquee and Main Street Station) will hook up to the green/red wire plug, while all other components will connect to a black/white wire plug. Pay particular attention to hooking up your Disneyland Marquee (special instruction are found on the following page)
C1 Disneyland Marquee
C2 Stroller Rental/Will Call
C3 Souvenir Stand by Main Street Bank
C4 Main Street Station
C5 Right Small Front Turnstile Gate
C6 Right Large Front Turnstile Gate
C7 Left Large Front Turnstile Gate
C8 Left Small Front Turnstile Gate
C9 Souvenir Stand by City Hall
C10 Newsstand
C11 Newsstand
Note: Newsstand will require both plugs to be attached For larger image, click here. |
All figurines and displays are copyrighted by ©Disney, ©Goebel Miniatures, and ©Olszewski Studios
info@olszewskistudios.com
Web Design By Moe Technologies, Inc.